I recently added the Midwest Industries Inc 8″ Fixed Barrel Chassis to my collection. This is a two piece chassis system for Ruger 10/22 rifles and Charger-length variants. The 8″ in the name refers to the handguard length, as they also offer a 13″ one. I chose to go with the shorter one for two reason. First, it was in stock. That was actually a big selling point. Second, I wanted to be able to use it on a rifle or pistol. It makes more sense than the 13″ version if you’re using it on a Charger. At this point, I’m on my sixth chassis build, and have a good feel for who gets it right, and who missed the mark. So let’s get right into it.
Chassis construction and specifications
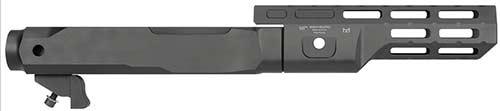
Both sections of the chassis are machined from 6061 aluminum, and then Type III Hard Coat anodized. Of all the finishing processes, this is one of the toughest, longest-wearing surface treatments. Before it gets that treatment, each part is dehorned. All sharp edges are removed, making it more comfortable to hold and carry. While not visibly noticeable, it certainly makes a difference in handling. Fit and finish is excellent throughout.
Overall length is 16.25″, with a weight of 1 pound, 7 ounces, including installation hardware. This is not a lightweight, competition chassis, but it’s not terribly heavy either. I chose it because I had the perfect barrel for it. Of the length, 8″ is the handguard, which has a 1.290″ inside diameter. Should I decide to swap my current 10″ KIDD barrel for a 4.5″ WhistlePig, my TacSol Axiom suppressor will fit nicely, with less than 2″ exposed. **Note that WhistlePig is now known as Acculite22.com.**
Features. All the ones you want and need
Some of the features are pretty standard fare for a chassis. It takes nearly any AR-compatible grip. I say “nearly”, because the ones with the high beaver tail won’t fit without modification. At the back, it’s threaded for a receiver extension. A set screw on the underside provides the option to go without a castle nut. So it’s easy to add a stock for a rifle or SBR build, or go with a brace. There are a lot of options in theory, but right now, it seems that availability is limited. And some prices are just ridiculous. Hence my choice to go with a tried and true Shockwave Blade. For fans of side-folding braces, I have seen an adapter that threads in and has a short Picatinny rail section to mount a folding brace.
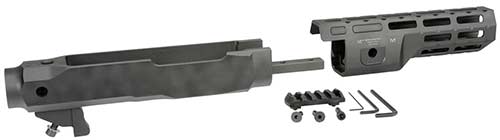
The sides of the chassis and handguard have built-in anti-rotation QD sockets for slings. Thanks to the angled design of the handguard, there are 8 sides of M-LOK™rail slots. At first, I thought the 8 sides were overkill. But that does give it a slimmer profile, and the rounded shape is more comfortable. In addition, each slot equals less weight. And in my humble opinion, the lines are just right for this style of firearm. Midwest Industries thoughtfully includes a 5 slot polymer rail too.
My build
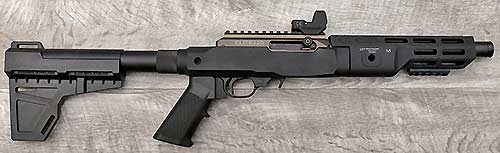
For this project, I had most of the parts on hand. The 10″ KIDD .920″ steel barrel was left over from another chassis project. At about two pounds, this barrel doesn’t belong in a lightweight chassis. No sense buying a light chassis to add a barrel that weighs more than twice as much. So it’s at home here. The receiver is a Tactical Innovations Elite22D. I’ll explain that choice in the next section. Trigger was a factory group with the KIDD ” Trigger job” drop in kit. I have since switched to a stock unit, for reasons explained later in this review.
Inside the receiver is a Tactical Innovations/Pike Arms match bolt, their charging handle, and v-block. High Tower Armory supplied the buffer. As usual, TandemKross KrossPins hold the trigger group in place, and their bolt release means I don’t need three hands to lock and release the bolt. The grip is a 68 cent mil-spec grip. A friend hooked me up with the Sig receiver extension, which has that knurling to match the grip’s diamond pattern. And the aforementioned Shockwave Blade brace finishes it off. I mounted a reflex site, then switched to a scope, so I could do some accuracy testing. It will probably end up with a reflex sight when done.
Installation. A valuable learning experience
When new parts arrive, it’s like Christmas. Except this time, it was more like April Fools. I failed to notice that the built in rail on my Elite22 receiver interfered with the handguard. No worries, I’ll just order the detachable rail model. Black was out of stock, and I’m not always known for being patient. Olive drab it is. A day or two later, a client asked me to order a receiver for him. Of course black was back in stock then. I should point out that I never order just a receiver. Might as well get a bolt, charging handle, v-block, and the rest of the pins, etc. Because I’ll use them all at some point. Expensive lesson here. This is why their website states “*Non-Ruger aftermarket receivers and accessories may or may not fit this chassis*”.
New barreled receiver in hand, I installed it into the chassis with the included non-standard screw. Then I slipped the handguard in place, and tightened the two screws on the underside. Receiver extension was next. Do that before the grip, so it’s easier to access the set screw behind the grip. Finally, the grip. When done, it was front-heavy, as expected. But with the rounded handguard, felt really good.
Since I had a spare reflex sight at the time, I mounted the included M-LOK™rail on top of the receiver. Which resulted in lesson number two. The fit between the chassis stub and the handguard is really good. In the photo below, you can see the part sticking out, which goes into a channel in the bottom of the handguard. So when I went to remove the handguard, and felt a bit of resistance, I figured it was just close tolerances. And I gave it a firm pull. Turns out the screw for the rail just barely touched my .920″ barrel. As I removed the handguard, I put a scratch in the top of the barrel. This is not a design flaw. It’s a reminder that with close tolerances and aftermarket parts, it’s on the buyer (or builder) to check fitment closely.
Function and conclusion
You might think that having to replace a $160 receiver, and scratching a $130 barrel would sour me on this project. But it didn’t. Even though it’s not very balanced, it’s a comfortable package. I did throw another Charger with a lighter barrel in it, and while you still feel the overall weight, removing more than a pound from in front of the trigger improves handling. The eight-sided handguard is worth the machine time. It’s just perfect for me. Small enough to grip, big enough to keep hands away from a hot barrel. Although my barrel seems immune to heat, as my nephews dumped plenty of full BX-25 magazines through it without it warming up much. They must think I’m made of money, or haven’t priced ammo lately.
I replaced the KIDD trigger with a factory unit because this Charger-length build with its heavy barrel is ideal for a specific task. I just need to get my hands on a binary trigger now. With the idea of a dedicated binary trigger “lead hose” build, I grabbed my GSG 110 round drum. And then my digital calipers. And every other chassis in my safe. Turns out that the chassis magwell is 1/100th narrower than the others I own. This probably contributed to the BX-25 magazines seating firmly, and not missing a beat. But my drum won’t fully seat in the magwell. Again, not every aftermarket accessory is compatible. My final decision here is that will shave that 1/100th off the drum sides, and make it dedicated to this chassis, once I get my hands on a binary trigger and some more bulk ammo. That’s a fair trade-off.
Let’s wrap this up
I have a lot of respect for Midwest Industries. They offer a lifetime warranty. They make their stuff here in America, which keeps Americans employed. And it keeps tax dollars local, which is good for their community. That’s important to me.
When I ran into the issues mentioned above, I sent them an email. None of the problems I ran into were design flaws, so I’m not laying blame. How companies respond to that feedback tells me a lot about them. I got a quick reply from them, and a satisfactory explanation. They design their products to work with the latest factory Ruger releases. Although they are always looking for ways to improve their products, they cannot guarantee compatibility with every aftermarket part or accessory. And as part of their continuous improvement, they are willing to take customer concerns into consideration, in order to work with a wider range of aftermarket parts. Very fair of them, and I would definitely continue to do business with them. If you’re interested in the rest of their products, check out Midwestindustriesinc.com.
When I placed my order, I paid full retail – $224.95, with free shipping. I did note that it was for a review, and they were kind enough to apply a small discount. But I wanted this chassis enough that I would have happily paid full price.
Comments? Questions? Have any of our readers tried out the Midwest Industries chassis, or any of their other parts and accessories? Feel free to share below.